Showing posts with label Guest Designer. Show all posts

Wednesday, October 12, 2011

Guest Designer Lala Palooza with BARBARA

Hello and Welcome
I am Barbara from Craft Me This 
I am so happy and excited today to be the Guest Designer for
Alex.  This is my very first time for me being a Guest Designer.

When the call went out, it was about 6AM and I was on my Lap Top in bed like I do every morning going through all my blogs that I follow.
Well I could not believe my eyes when I read Alex’s post looking for Guest Designers.  So I went into action and emailed her and here I am. (Exciting)  Thanks Alex.

For my project today I am making a Pen and Pencil Holder, etc.  It is made from the Toilet Paper Roll!!  So I went to all my neighbors and requested all their T.P. Rolls.  I can’t get them fast enough.  Once you start making these you want to make more.

                You start with a T.P. roll.
                Cut your card stock or your choice at 4”x6.5”
                Cut another piece of the same or contrasting color for the top at 2”x5 ¾”
                And score or fold the length so you have an overhang of about ½”
                Cut Slits along the length so it is easy to fit into the T.P.  roll
                The Base is wood and cut on a Drill Press by my husband Tommy. 
                 The size is 3” in Diameter and 1/2" high.                
                 The inside hole fits the T.P. roll at 1 ½”
Assemble the above and decorate.


Thanks for stopping and sharing my day as the Guest Designer for Alex.
You can visit me at my blog
http://letsgocrafting.blogspot.com/ 
  
Pin It!

Monday, October 10, 2011

Week 18: Made It Myself Monday AND Guest Designer LoLa PaLooZa with Jessica

Hi, my name is Jessica and I'm otherwise known as the  That'z Uneek or Jess B. Ippity Stamps


Today, I have been given the honor and privilege to be one of Alex's Guest Designers during her hiatus! She will be returning soon so don’t be dismayed. 


Alex has given us GD’s a carte blanche pass to design whatever we wish to for her followers. Woot Woot!


Looking back... we met through a KinderStampO blog hop about a year ago. Although we never physically met I feel that I’ve known Alex forever.  Glad to have her as my cyber friend.  She always has wonderful tutorials and fantastic inspirations throughout her site.

Total AWESOMENESS!
I have decided to design a
Mi Casa Es Su Casa
Welcome Shadow Box

Congratulations on your new home my friend!


 Lately I've been catching the sun rising and sun setting
 I am sure living near the coast and having it up close and personal 
would bring anyone joy
 Capturing God's in all HisGlory
Thanks for stopping by
for more details hop to my blog
Jess B


NOW IT'S TIME TO PARTY!!!!
Never partied here before? Check out the deets below...

1. Link any crafty project NEW or OLD.
2. Link UP to 3 projects.
3. Place the party BUTTON on your post.


BLOG TITLE
4. Visit and Comment on at least 2 Other Blogs
5. Lastly, leave a comment HERE!


Pin It!

Friday, October 7, 2011

Doctor in the HOUSE! Guest Designer Lala Palooza with DR SONIA

DIY Photo frame Tutorial

Photo Frame Tutorial
Hi ,I am Dr Sonia S V  an ENT Surgeon from Bangalore , India. I dabble in various crafts as a stress busting hobby.
I am so thrilled to be the Guest designer at Alex fabulous blog . Her weekly link up parties are the best and the source of so much information and inspiration. Thank You so much Alex for this honor to write for your blog!
I love recycling and transforming what is lying around the house to something beautiful and useful.You help the environment as well as your pocket! Sharing 2 simple ways to make a DIY photo frame!
This gorgeous photo frame is in fact and old desktop calendar !
Photo Frame Tutorial
One side has hand made roses made from a 5 petal punched flower and leaves which were hand cut from an old grocery box.I drew the stems and swirls with glitter glue and added magenta rhinestones.
Photo Frame Tutorial
Since the desktop calendar has 2 sides you can make a double sides photo frame.On the other side of the photo frame I added some ribbon flowers and gemstones and pearls.
Photo Frame Tutorial
Added some red lace on the top border and some pearls on the ribbon roses and the flower shaped gemstones.
Photo Frame Tutorial
Materials required to make the Photo Frame
DIY Photo frame tutorial
  • Old Desktop calendar- If you dont have one you can use cardboard pieces like I have done in the 2nd tutorial here.
  • White Glue
  • Craft Knife - should be sharp to avoid ragged edges
  • OHP sheet[ Transparency] - Optional - good quality scratch free
  • Photo - to serve as a template guide for your frame
  • Thick paper,cardboard, foam or felt- I used 2 sheets of corrugated paper the same size as the desktop calendar. You can even use fabric to wrap the cardboard for a lovely texture.
Make the front of your photo frame: Take your cardboard/Paper pieces and center your photo on it and mark all around to get your aperture.
DIY Photo frame tutorial
Cut out  the marked area at a slightly smaller size [ so that the frame will overlap your photo slightly]
DIY Photo frame tutorial
Place an OHP/ transparency over the marked aperture and mark out the size required - I allowed my transparency to cover slightly more than the aperture  on 3 sides[ below, top and left] and reach till the right edge of the frame
Apply glue to 3 borders leaving a small margin near the aperture.And stick on to your desktop calendar.
When dry you can slip in your transparency and your photo
DIY Photo frame tutorial
Decorate your frame with stickers, shells, beads, gems what not!
My blogger friend Indira who was the inspiration behind this desktop calendar photo frame shared an idea to remove the spring and replace it with nylon strings. I threaded a golden ribbon through the slots of the original spring on the desktop calendar [This step took longer than making the whole frame! So if you want a quick and easy frame leave the original spring on!]
Handmade Punch craft Rose
Making a photo frame from a desktop calendar is easy as there is hardly any cutting involved, it stands on its own and you don't need to make a stand for it.
If you don't have a desktop calendar you can use cardboard pieces or recycle a cardboard box and make this easy and inexpensive homemade photo frame
Photoframe Tutorial
I am a bit of a " junk collector" and in addition to all sorts of junk, I dont throw away boxes either and this is the box I recycled into a photoframe.
Photoframe Tutorial
Here you need the same materials as  in the earlier Photo frame tutorial except that instead of a desktop calendar you can use cardboard pieces or a cardboard box which you can recycle.
You need 2 similar sized cardboard pieces for the front and back of your photo frame - thickness depends on how sturdy you want your photo frame to be. I used the 2 sides of my cardboard box
Photoframe Tutorial
Make the front of your photo frame as in the earlier tutorial.
If you plan on frequently changing your photo ,cut off a centimeter or so from the top central part of the back as shown so as to allow easy sliding in of the transparency and the photo. If you are going to use the same photo in the frame you can skip this step.
Photoframe Tutorial
Cut your OHP/ transparency slightly more than the size of your frame aperture. I allowed my transparency to cover slightly more than the aperture  on 3 sides[ below, right and left] and reach till the top
Stick some pattern paper if you want to the back of the photo frame[ optional  as once your photo is in the frame this area is not seen - however if you want to gift the frame cover it with pattern paper so that it looks prettier.
Photoframe Tutorial
Apply glue to the back of the front of the photo frame leaving a small gap of a few millimeters from the aperture edge. Dont apply glue to the top as this is where you will slide your photo in.
Photoframe Tutorial
Stick the front and back together and leave to dry well.
Photoframe Tutorial
Make a stand for your photo frame using a strip of cardboard. Take a wide strip of cardboard and bend one end up as shown. I have bent up a 2 cm strip
Photoframe Tutorial
Decorate your photo stand strip if your wish. Here I have used the same corrugated paper as the front for a matching effect.Apply glue to the back of the bent strip 
Photoframe Tutorial
Position your stand strip at the center and stick it to complete your frame
Photoframe Tutorial
Your basic photo frame is ready
Decorate your photo frame as you desire:Use shells, beads, quilling, punch craft, clay craft , mirrors , mosaic tiles etc
Photoframe Tutorial
You can slide in the transparency and the photo once you have decorated your photo frame.
I made the paper roses using a 5 petal punch[ shall share tutorial soon on my blog] .
Photoframe Tutorial
The leaves and branches have been hand cut from this glossy green box [Now you can see how serious I am about collecting stuff!].
Photoframe Tutorial
The gorgeous pink pearls are from my daughter necklace which had broken!
Photoframe Tutorial
I have glued on the base of  the leaves after giving a small fold so that the leaves stand up at angles
Photoframe Tutorial
I hope I can tempt you into recycling some cardboard or an old desktop calendar to make a DIY photo frame. 


Since I am a self taught crafter  learning from fellow bloggers on the net and books,I like to give a bit back by posting tutorials on my blog. Do drop by my blog Cards Crafts & School Projects to check out some more of my tutorials. Thank You  Alex once again for this wonderful opportunity.


Pin It!

Wednesday, October 5, 2011

Guest-Designer-Lala-Palooza with CARRI ~ ABUSYBEE

I am so honored to be a guest designer today for Alex here at You Had me at Craft! I have been a follower of Alex since the start and learned how to do chalking  when she posted a video for "LEARN A TECHNIQUES"  BLOG HOP back in June 2010! (Thanks Alex!) Time sure flies when you are having fun!

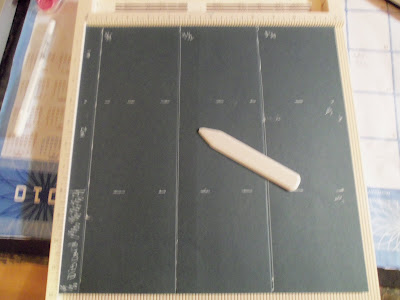
Today I wanted to share how I make a mini scrapbook using only one sheet of 12X12 Paper.

Take one double-sided 12X12 paper


Score top at 3/4" - 4 1/2" - 8 1/2"
Turn paper once to the left and make cut lines at 4" and 8"

Turn paper two times to the left; 1st 3/4" square mark as discard
2nd box mark # 2
3rd box mark # 1

You do not have to mark up your paper, you can just score and cut as you go, I just marked mine to show what it would look like.

I score my lines first using my Martha Stewart Score Pal


 Then Fold the score lines


Next cut along the 4" and 8" marks discard the top left 3/4 discard piece


 Now adhere strip # 2 to the strip that had the discarded strip


Then adhere the entire strip to the # 1


 Then fold!

Now you have a mini book! 18 pages long! Each page appx 3 3/4" by 4"

Now for the fun part! Time to pull out all those scraps and start decorating!

Here is my completed Halloween book! I hope you enjoyed my mini tutorial and project!


If you would like to see more of my projects please stop over to my blog HERE!


www.doubleclickconnections.blogspot.com

Thank You Alex for inviting me to be guest designer!
Pin It!

Wednesday, September 28, 2011

Guest Designer Lala-Palooza with LAURA

Hi, it's Laura from Makin Pretty Things!
First, I want to thank Alex for
my Guest Designer spot! :)
Now, if you've been out at craft fairs
or trade shows, you may
have noticed a big trend this year
is the Primitive Folk Art.
The pretty willow tree, the rustic houses,
the misshapen stars...it's all so pretty!
I noticed there wasn't anything really
like the Prim/Folk on any Cricut
cartridges or online SVG stores,
so I created a set that I'll be giving
away for FREE on my blog!
I want to share some
projects made using the
"In the Country" SVG set!
The first is this 5 x 5 card (sentiment from
Scrappy Moms Stamps "All in the Family").
An altered gift bag with little house tag...
And last but not least, this wall art.
I purchased a plain wooden sign
at a local value store for $2.
It measures 15 x 7.
There was an image on the front of the sign,
so I used the 12 x 24 Cricut mat and
the 12 x 24 DCWV adhesive paper to stick on top,
but you could use Terrifically Tacky Tape
or any other strong adhesive.
I used Pop Dots on the house
and Zig 2 Way Glue for everything else.
Here's the entire SVG set!
If you'd like this SVG set, come on over to my blog and
comment on this post with
a way to email it to you!

~Laura~
Pin It!